PAINT YOUR FRAME with LIGHT
Words and images by Ken Ashman Copyrighted © 2019 All rights reserved.
I started out as a photographer in my young 20's doing weddings and environmental portraiture. Over the years I learned to use light to "paint" my subjects and create a sense of depth in my images. Now I do underwater photography, and I've found the lighting techniques I learned shooting people work very well underwater. In writing this essay it's my desire to share what I've learned.
(Click for a larger version of each image. Use your browser back button to return.)
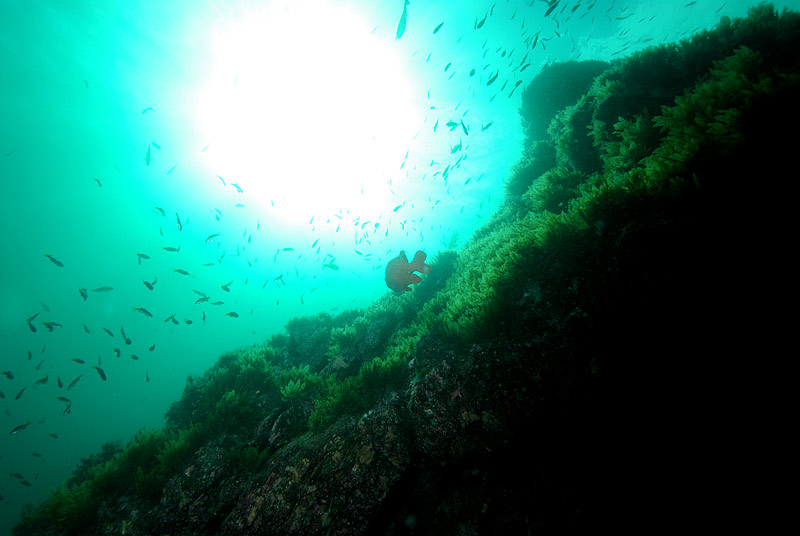
Bonaire, 45 ft depth. Exposure with dual strobes and ambient sunlight.
18mm (equiv.) lens, F13 125th ISO 100
Painting with light and shadows.
Highlights and shadows show the contours, character, and textures. Sharply angled lighting can create a tactile effect, and make it so you can almost feel the subject. I’m a big fan of showing a wide dynamic range — dark-black to bright-white, and every gradient in between. If everything works together it can create a near 3-D effect.
Getting close is the only way to go with underwater photography. Less water between your lens and subject means sharper detail and less silt in your frame. To show max detail, the subject needs to pretty much fill the frame and stand out against the background.
How a subject is situated goes a long way in determining what you can do with lighting and composition. If an animal is out in the open where you can position your strobes nicely, you’ve got it made. More challenging positions require more creativity.
Take LOTS of shots. Try different angles, and adjust your strobe positions as you go along. Taking LOTS of images is the way to come back with keepers.
A macro shot of a Red Octopus rubescens among brittle stars at Santa Cruz Island. The frame here is about 5 inches across. Dual strobes with no ambient light.
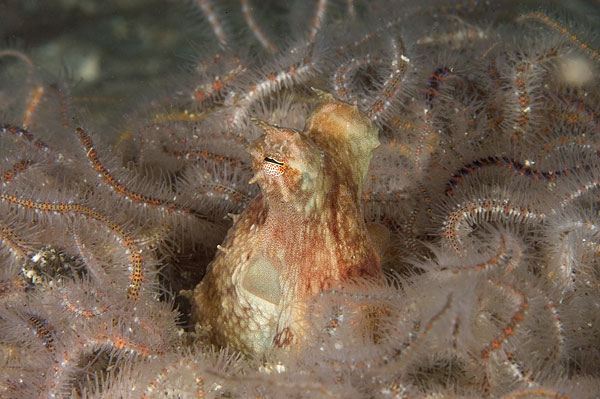
I usually shoot with two strobes, controlled manually. Sometimes I use diffusers to create a softer, more gradual light fall-off. Mostly I prefer the sharper edges created by shooting without diffusers. Diffusers reduce the amount of light - a good thing when shooting macro and the lowest strobe setting is still too much light. The only other solution is to position the strobe farther away from the subject. Long stobe arms - 3+ ft. - come in handy.
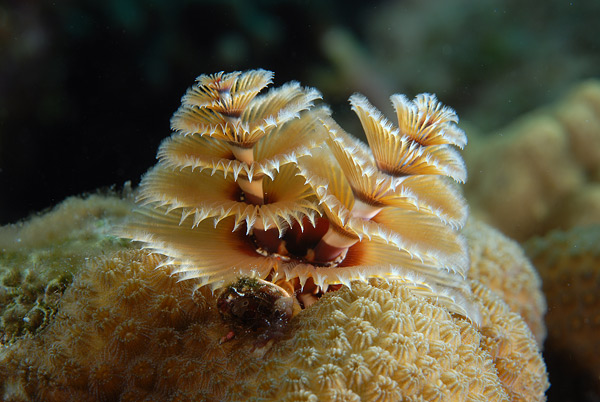
Christmas tree worm on coral at Bonaire. Dual strobes no ambient light.
A fair amount of my wide angle images include ambient sunlight. Often there are large areas in the frame beyond the reach of the strobes. To figure out how to proceed I look carefully at how the natural sunlight is hitting the reef.
Thousands of sardines at the Sea of Cortez, MX. 35 ft. depth. Dual strobes and ambient light. A large part of this frame is beyond reach of the strobes, so the balance of ambient light and strobe light is important.
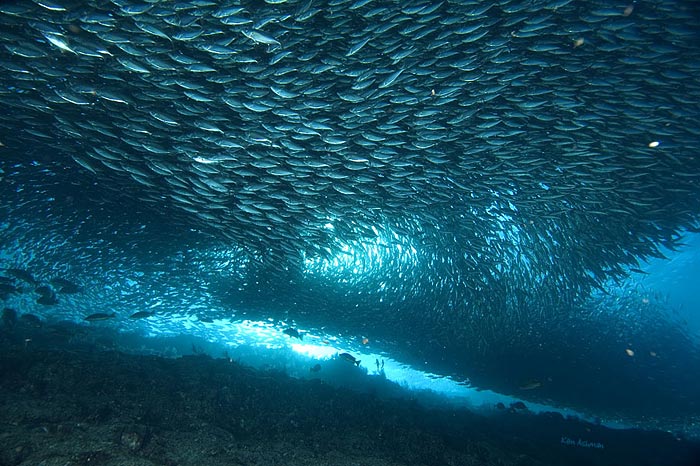
18mm (equiv.) lens, F11 60th ISO 100
To get the ambient light right, start by turning off your strobes.
First, choose the shutter speed you will use (based on the lens focal length.) Rule of thumb is use a faster speed for a longer lens. My "go to" shutter speed is 125th, but if I am shooting a 105mm lens and the water is moving me around, 200th is better. If I am shooting a 12-24mm lens in calm conditions, 60th of a second is fine.
Next, set your ISO and aperture. Keep in mind, the depth of field you end up getting depends on the lens-to-subject distance and the aperture setting you choose. Take multiple test shots to make sure you are getting the ambient areas of your frame exposed the way you intend. It's a good idea to angle your lens upward towards sunlight if you can.
Catalina Island, CA, using only ambient sunlight. Looking up from 20 ft.

18mm (equiv.) lens F13 125th ISO 200
After your ambient exposure is set, aim your strobe(s).
Your primary strobe is the key light, and provides most of the light for the exposure. It shows off the texture and shape of the subject. The other strobe (if you use one) is the fill light and points at the shadow created by the key light. It is important for the fill light to be about half the power of the key light - or less - otherwise your overall lighting will become flat. If you don't use a second strobe, look for sunlight to provide the fill.
Invertebrates covering a wall at Wilson's Rock, San Miguel Island, CA. Ambient light and one strobe. Shot at 65 ft., looking upward.
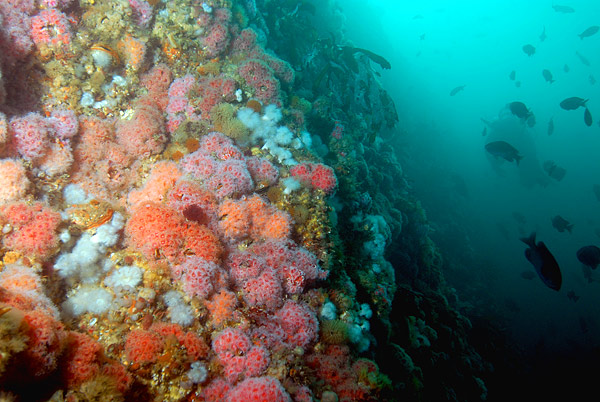
36mm (equiv.) lens F8 125th ISO 200
Position the key light somewhat above your subject and as far to one side as possible. Point it towards the part of the frame you want to emphasize. (i.e. the face of the animal, the area of interest, etc.) Angle the light beam so the edge hits your subject but not your lens port. Set the power output so you get a good exposure without "blowing out" the highlights. This applies if you are using ambient light in the shot or not.
Next, position the fill light on the other side, horizontal with the subject. Point the fill at the shadow created by the key light. The ideal “no-backscatter” approach is to point your strobes so they hit the subject but avoid the area of water between the subject and lens.
Strawberry Anemones at Wyckoff Ledge, San Miguel Island, CA. Close in wide angle dual strobes no ambient light. The key light is positioned far left and above, with the light raking across surface of the anemones. The fill is 2 stops below the key light, and keeps some of the shadow areas of the frame from being black. This shot has a wide dynamic gradient range.
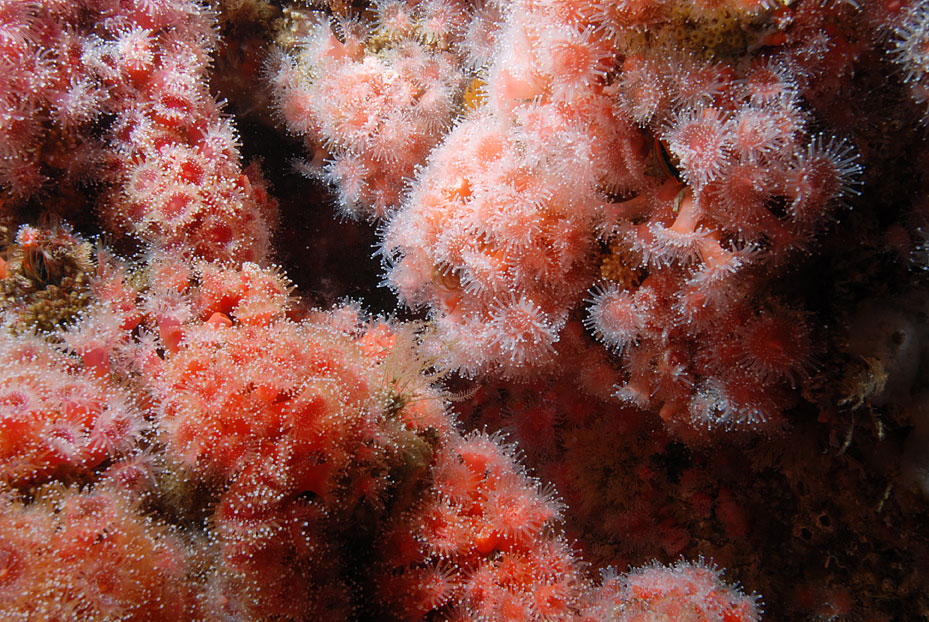
36mm (equiv.) lens F18 125th ISO 100
Hermissenda crassicornis. (The Horned Aeolid.) The frame is three inches across. Dual strobes no ambient light. The key light is far left and above, positioned beyond the slug and pointing back. This creates a back lit effect, and shows off the translucent aspect of the animal. (You can see the gold stripe through the rhinosphore.) The fill is near invisible, coming from the right and is set 1 1/2 stops below the key.
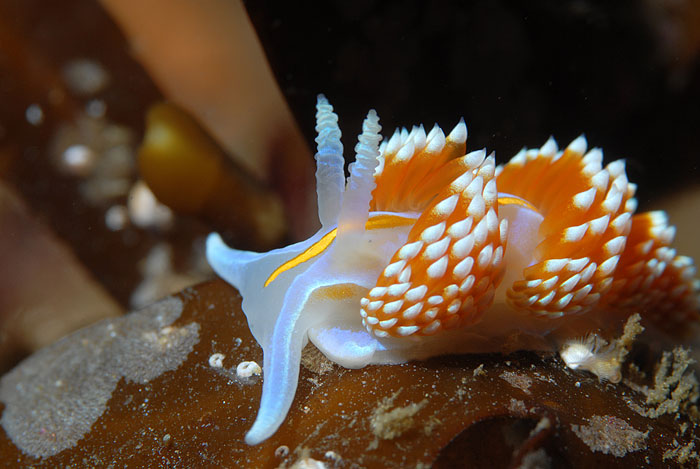
157 mm (equiv.) lens F22 200th ISO 100
The trick to getting great images is using light to paint your frame. Take LOTS of shots! Try as many variations on all of these ideas as you can come up with. When you find a nice target out in the open, take your time and experiment!
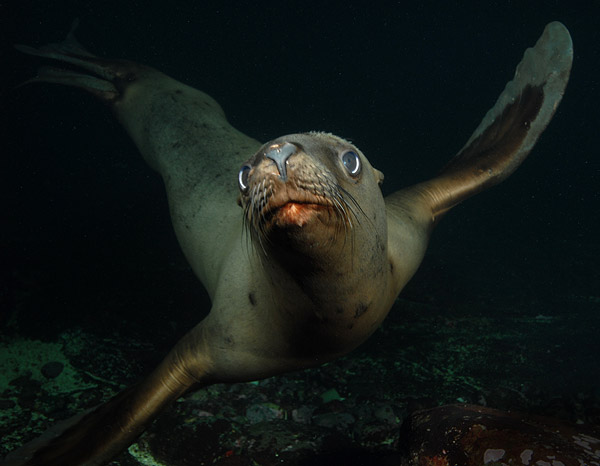
This image of a juvenile Stellar Sea Lion at Hornby Island, British Columbia, uses two strobes but no ambient light. If you look closely at the shadows and highlights you can see the key light is positioned at 11 o'clock and the fill at 3 o'clock.
Some things to remember:
If you are including ambient light in your frame:
- Think about ambient light before you think about strobe light.
- Point your lens so the sunlight is where you want it in your frame.
- Adjust settings to include the amount of ambient light you want.
If you are including ambient light or not:
- Position your strobe(s) to show texture.
- Set the key light bright, but avoid blowing out the highlights.
- Point the fill light at the shadows. Set it half as bright as the key light, or less.
Good luck in your underwater hunts, and safe diving! -KA
|